Manually UEFI Boot Linux and Windows 10 USB from Grub
Introduction
Dead boot of Linux or Windows needs a lot of labor when sometimes it just does not work.
Legacy boot mode does not support hard drives that provides more than 2TB disk space, and mostly you would like to use UEFI mode for better Windows 10 support.
With this tutorial you may:
- Learn how to boot from a blank computer into grub via changing BIOS options
- You need a working computer with Linux
- Note: it may differ from BIOS to BIOS, but the basic idea does not change
- Learn how to boot from multiple different Linux distribution ISO images from a UEFI compatible USB device
- Learn how to boot Windows 10 USB in grub
How to boot from a blank computer into grub via changing BIOS options
Select Correct BIOS Options
- Reboot to BIOS Setup
- Disable Fast Boot
- This feature in BIOS enables faster boot speed by skipping some of the processes which might leave USB support uninitialized, and therefore best switch it off when booting from USB.
- After operating system is installed in hard drive, you may safely re-enable this config.
- Disable Secure Boot
- Some of the linux distributions are treated as secure with windows certificates, i.e. Ubuntu, Fedora, OpenSUSE, etc., however it might still arise some problems when booting.
- Best switch off at installation.
- After installed, you may simply test it to see whether your installation is compatible with secure boot or not, and also, safely re-enable it if it's compatible.
- Disable CSM(Compatibility Support Module) Mode/Load Legacy Mode
-
CSM ModeorLoad Legacy Modeenables booting from both UEFI mode and Legacy mode - However, it might introduce bugs into your installation process, and quietly boot into legacy mode (and installs in legacy mode)
- Best switch off for always.
-
- Disable Windows Fast Startup if windows is currently installed
- Normally in power settings from Windows 8 and above
Create a UEFI compatible USB (MSDOS Partition table)
Here, I'm using Ubuntu 16.04 as an example. Operations can be safely inferred for other distributions.
I'd recommend using gparted if you prefer GUI tools. Here I'm showing you the way to do it via terminal only.
Step 1: Backup your USB stick, and format to fat32
# Install `parted` if it's not available
>> sudo apt-get install parted
# List your current USBs and show its filesystem
>> lsblk --fs
sdc
└─sdc1 ntfs         27A49F7C52477E8D
# It shows: my demo USB stick is /dev/sdc,
# and it has one partition /dev/sdc1 in NTFS filesystem
# Show mktable help
>> sudo parted /dev/sdc help mktable
  mklabel,mktable LABEL-TYPE               create a new disklabel (partition table)

	LABEL-TYPE is one of: aix, amiga, bsd, dvh, gpt, mac, msdos, pc98, sun, loop
# Create MSDOS partition table
>> sudo parted /dev/sdc mktable msdos
Warning: The existing disk label on /dev/sdc will be destroyed and all data on this disk will be
lost. Do you want to continue?
Yes/No? y
Information: You may need to update /etc/fstab.
# Show mkpart help
>> sudo parted /dev/sdc help mkpart
  mkpart PART-TYPE [FS-TYPE] START END     make a partition

	PART-TYPE is one of: primary, logical, extended
	FS-TYPE is one of: zfs, btrfs, nilfs2, ext4, ext3, ext2, fat32, fat16, hfsx, hfs+, hfs, jfs,
	swsusp, linux-swap(v1), linux-swap(v0), ntfs, reiserfs, freebsd-ufs, hp-ufs, sun-ufs, xfs,
	apfs2, apfs1, asfs, amufs5, amufs4, amufs3, amufs2, amufs1, amufs0, amufs, affs7, affs6,
	affs5, affs4, affs3, affs2, affs1, affs0, linux-swap, linux-swap(new), linux-swap(old)
	START and END are disk locations, such as 4GB or 10%.  Negative values count from the
	end of the disk.  For example, -1s specifies exactly the last sector.

	'mkpart' makes a partition without creating a new file system on the partition.
	FS-TYPE may be specified to set an appropriate partition ID.
# Create a partition
>> sudo parted /dev/sdc mkpart primary fat32 0% 100%
Information: You may need to update /etc/fstab.
# Format into FAT32
>> sudo mkfs.fat -F 32 /dev/sdc1
mkfs.fat 3.0.28 (2015-05-16)
# Enable boot flag for your partition
>> sudo parted /dev/sdc set 1 boot on
Information: You may need to update /etc/fstab.
# Check it
>> lsblk --fs
sdc
└─sdc1 vfat         F1BE-F6D4
# It's now in vfat (fat32) filesystem
Step 2: Extract ISO image content
# Mount your usb stick
sudo mount /dev/sdc1 /mnt
# extract ISO image into it, you might need to
# install p7zip if 7z is not found
sudo 7z x ubuntu-16.04.2-desktop-amd64.iso -o/mnt
# Umount your usb stick
sudo umount /mnt
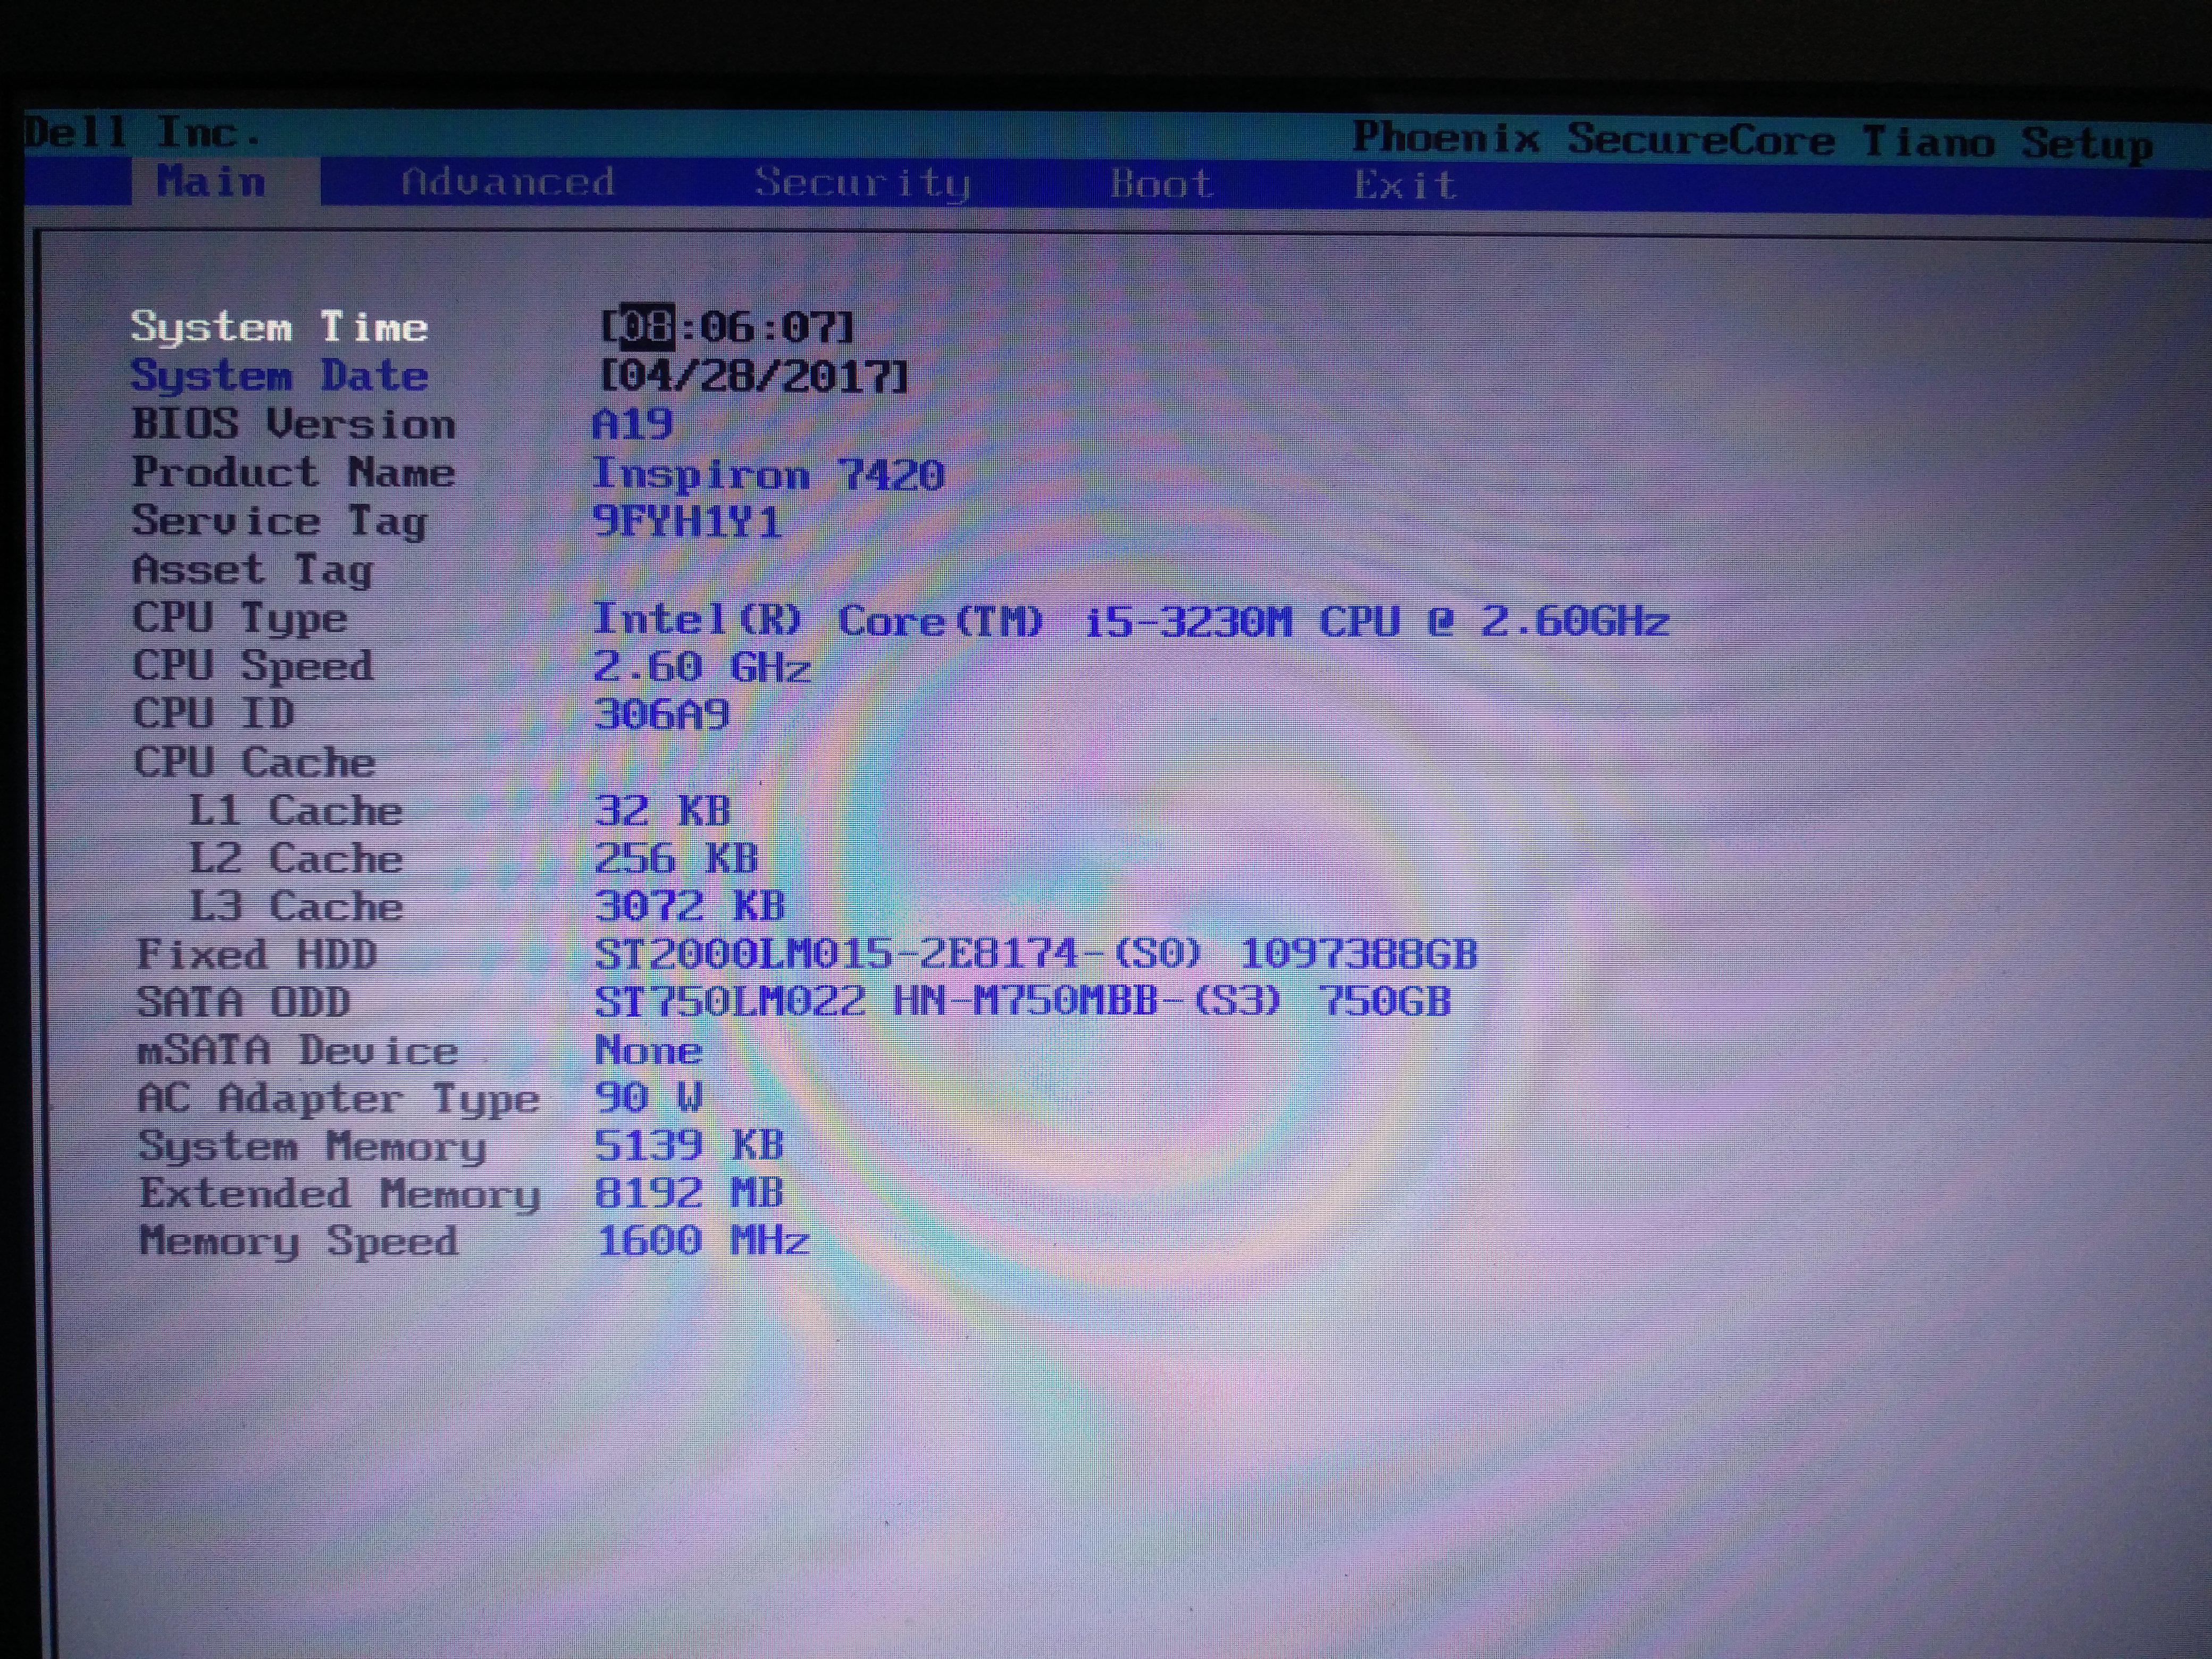
Step 3: Reboot and Configure BIOS
I'm using Dell Inspiron 7420 as a demo, and its BIOS is Phoenix A19.
Old BIOS is likely not to get configurations correct, and the support for UEFI is miserable in convenience.
Mostly boot configurations are in BOOT tab, and after you select that you would like to boot in UEFI mode,
you will see that your USB is listed as a boot choice, like following:
Note: The boot flag might be set improperly if you cannot see any USB related stuffs here
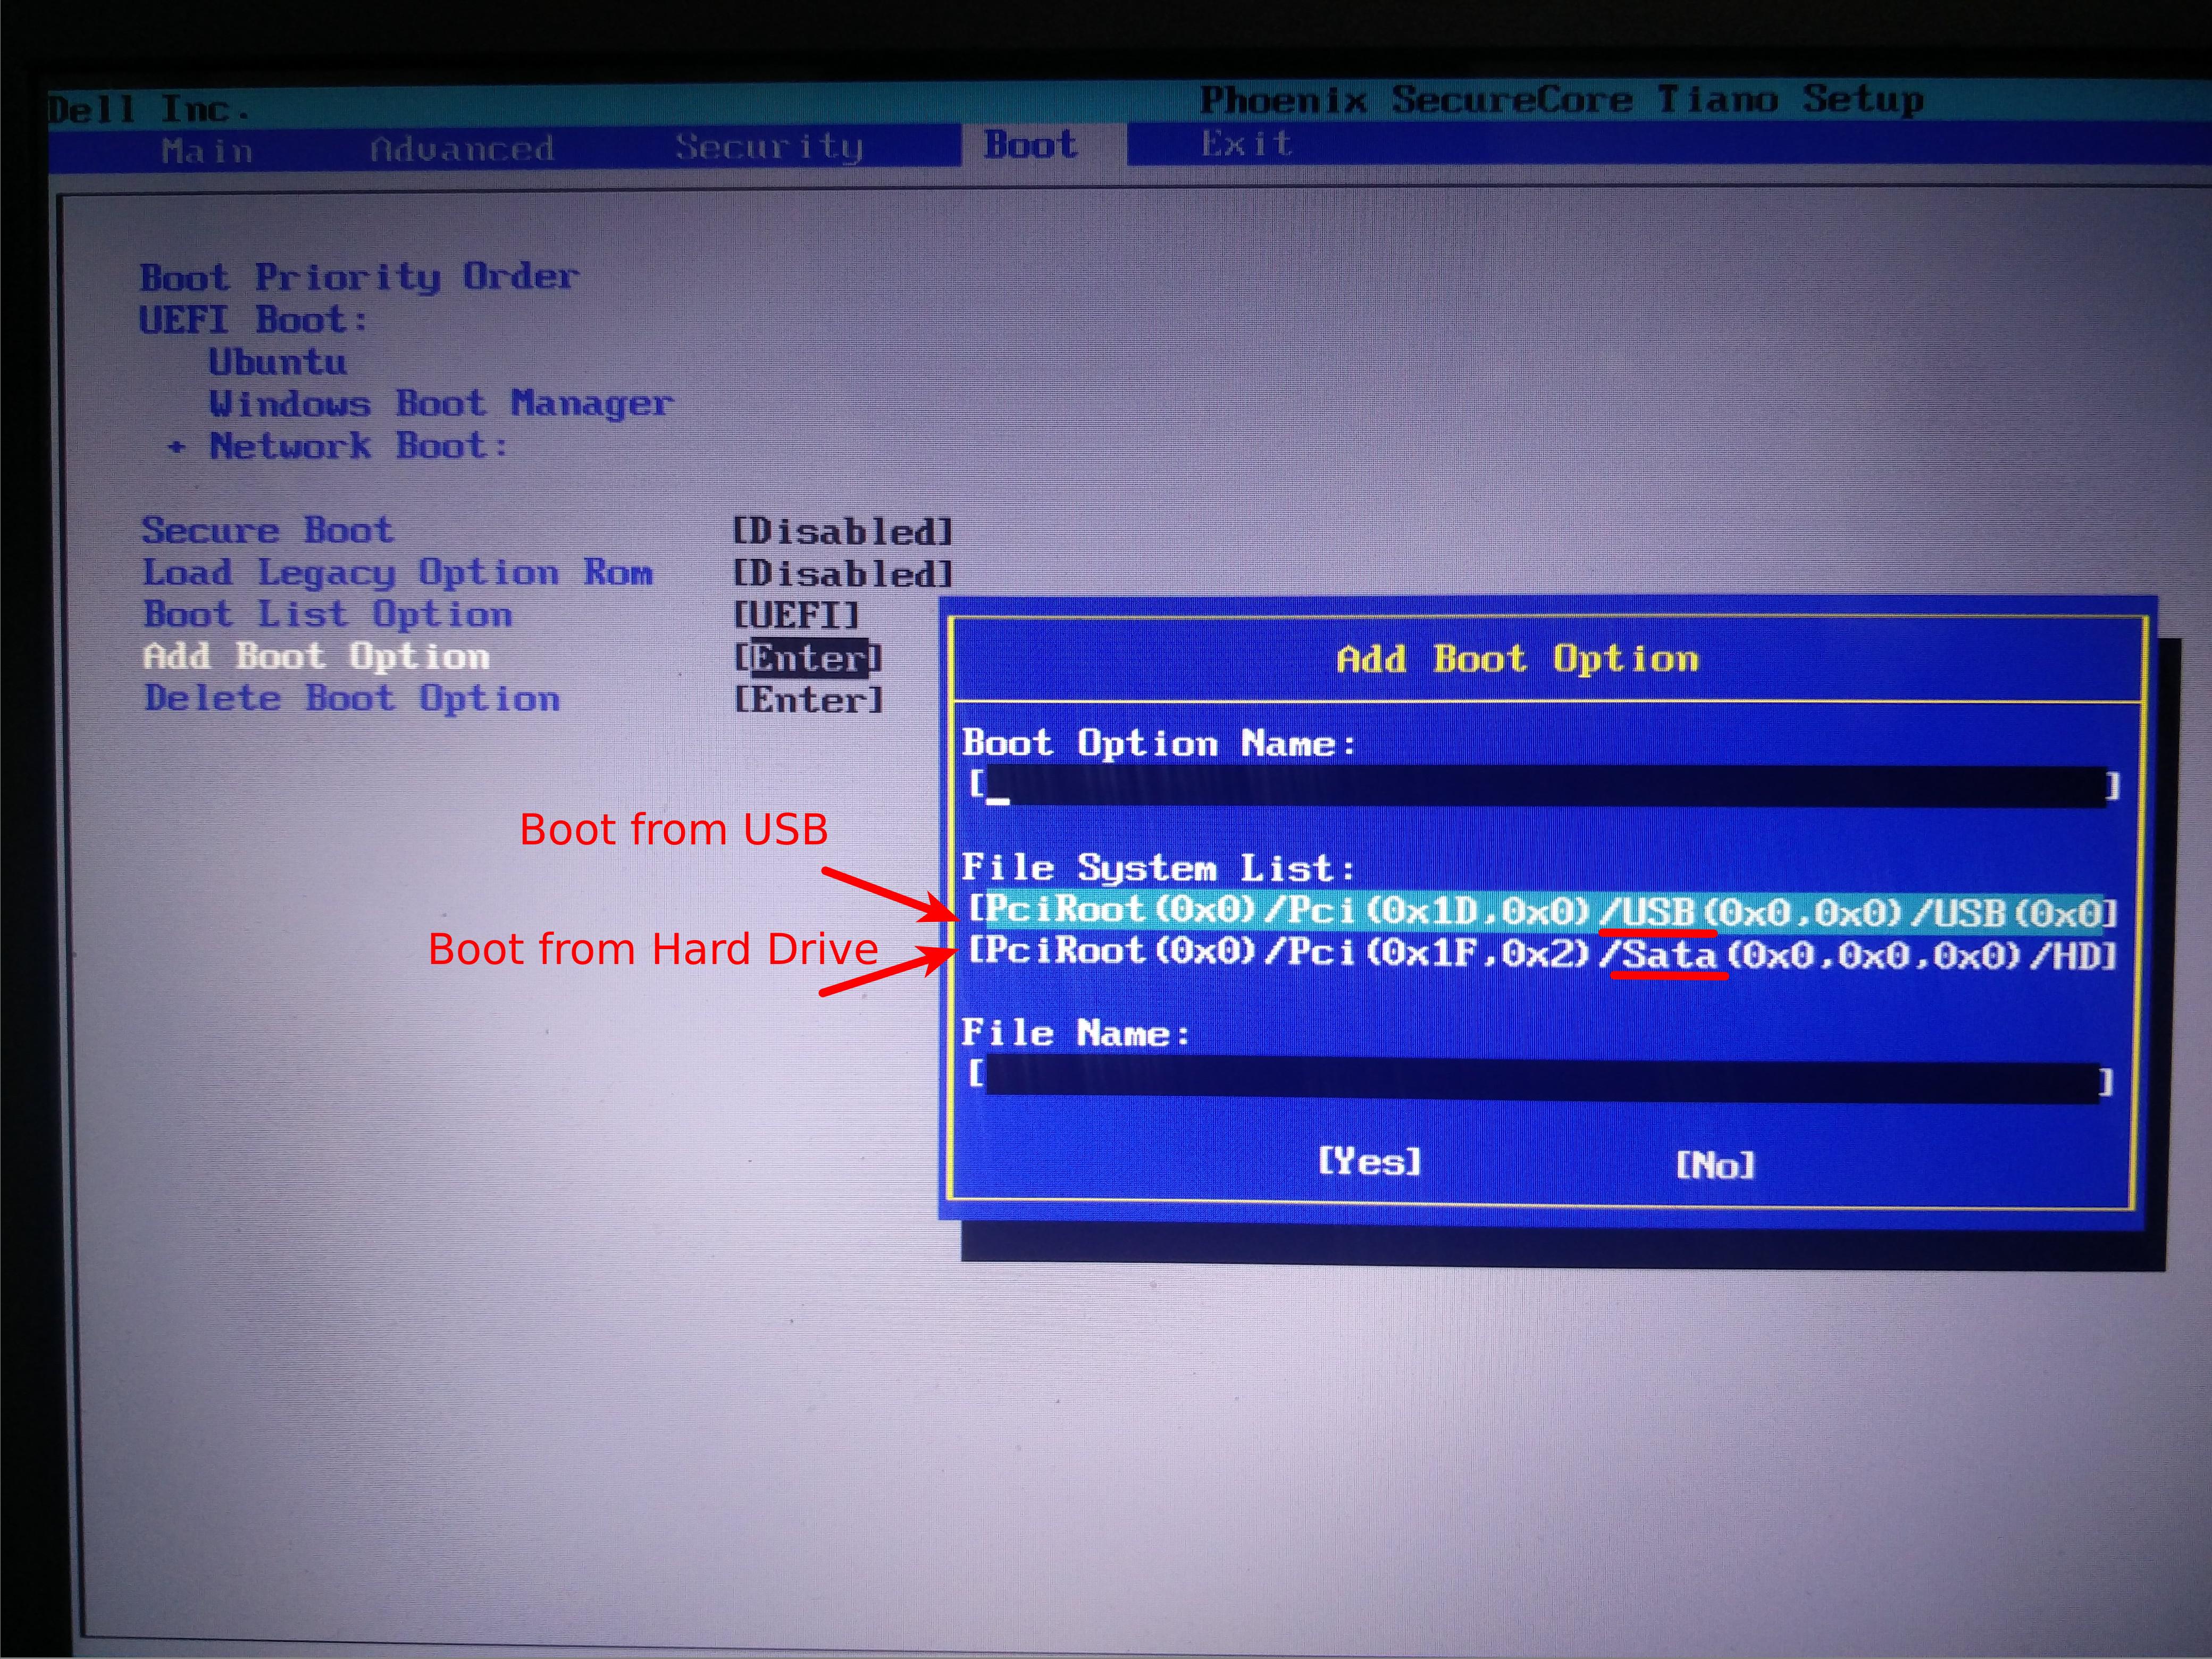
Normally it is a convention for UEFI compatible devices to install a
bootloader in /efi/boot/boot<arch-name>.efi for itself.
For example, x86_64 should be: /efi/boot/bootx64.efi
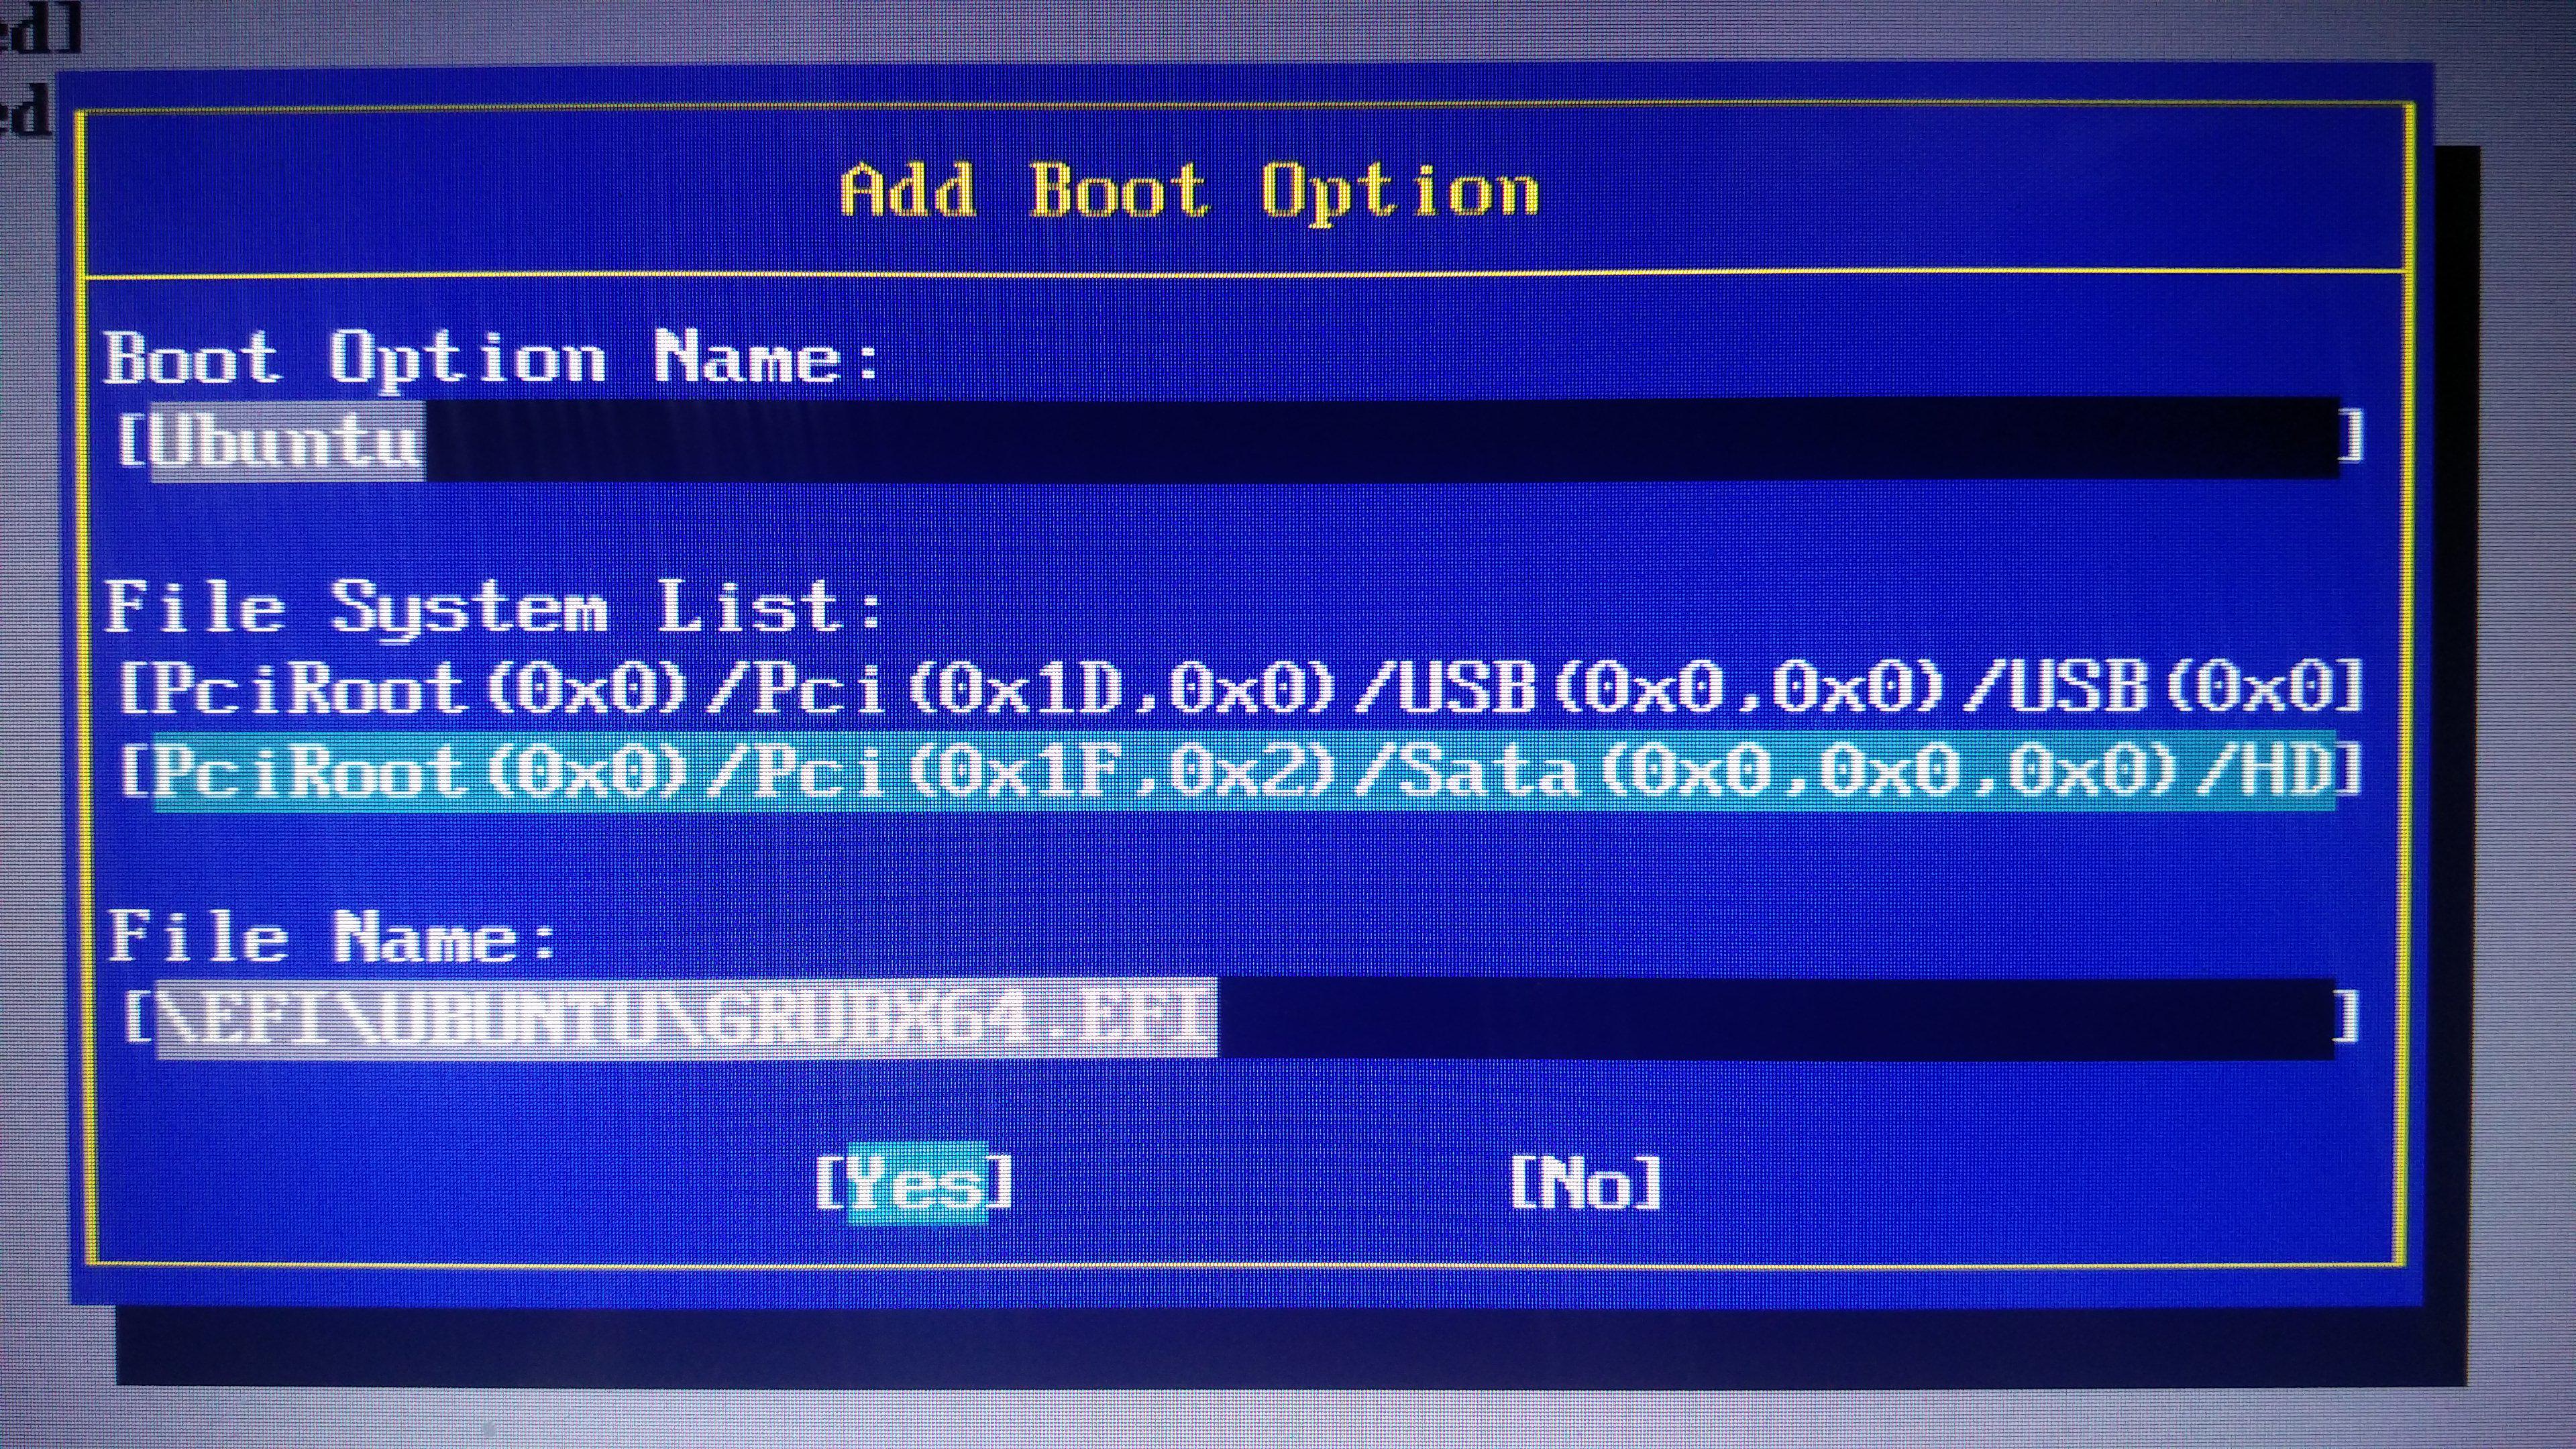
And therefore, you can Add a boot option, and fill-in as following:
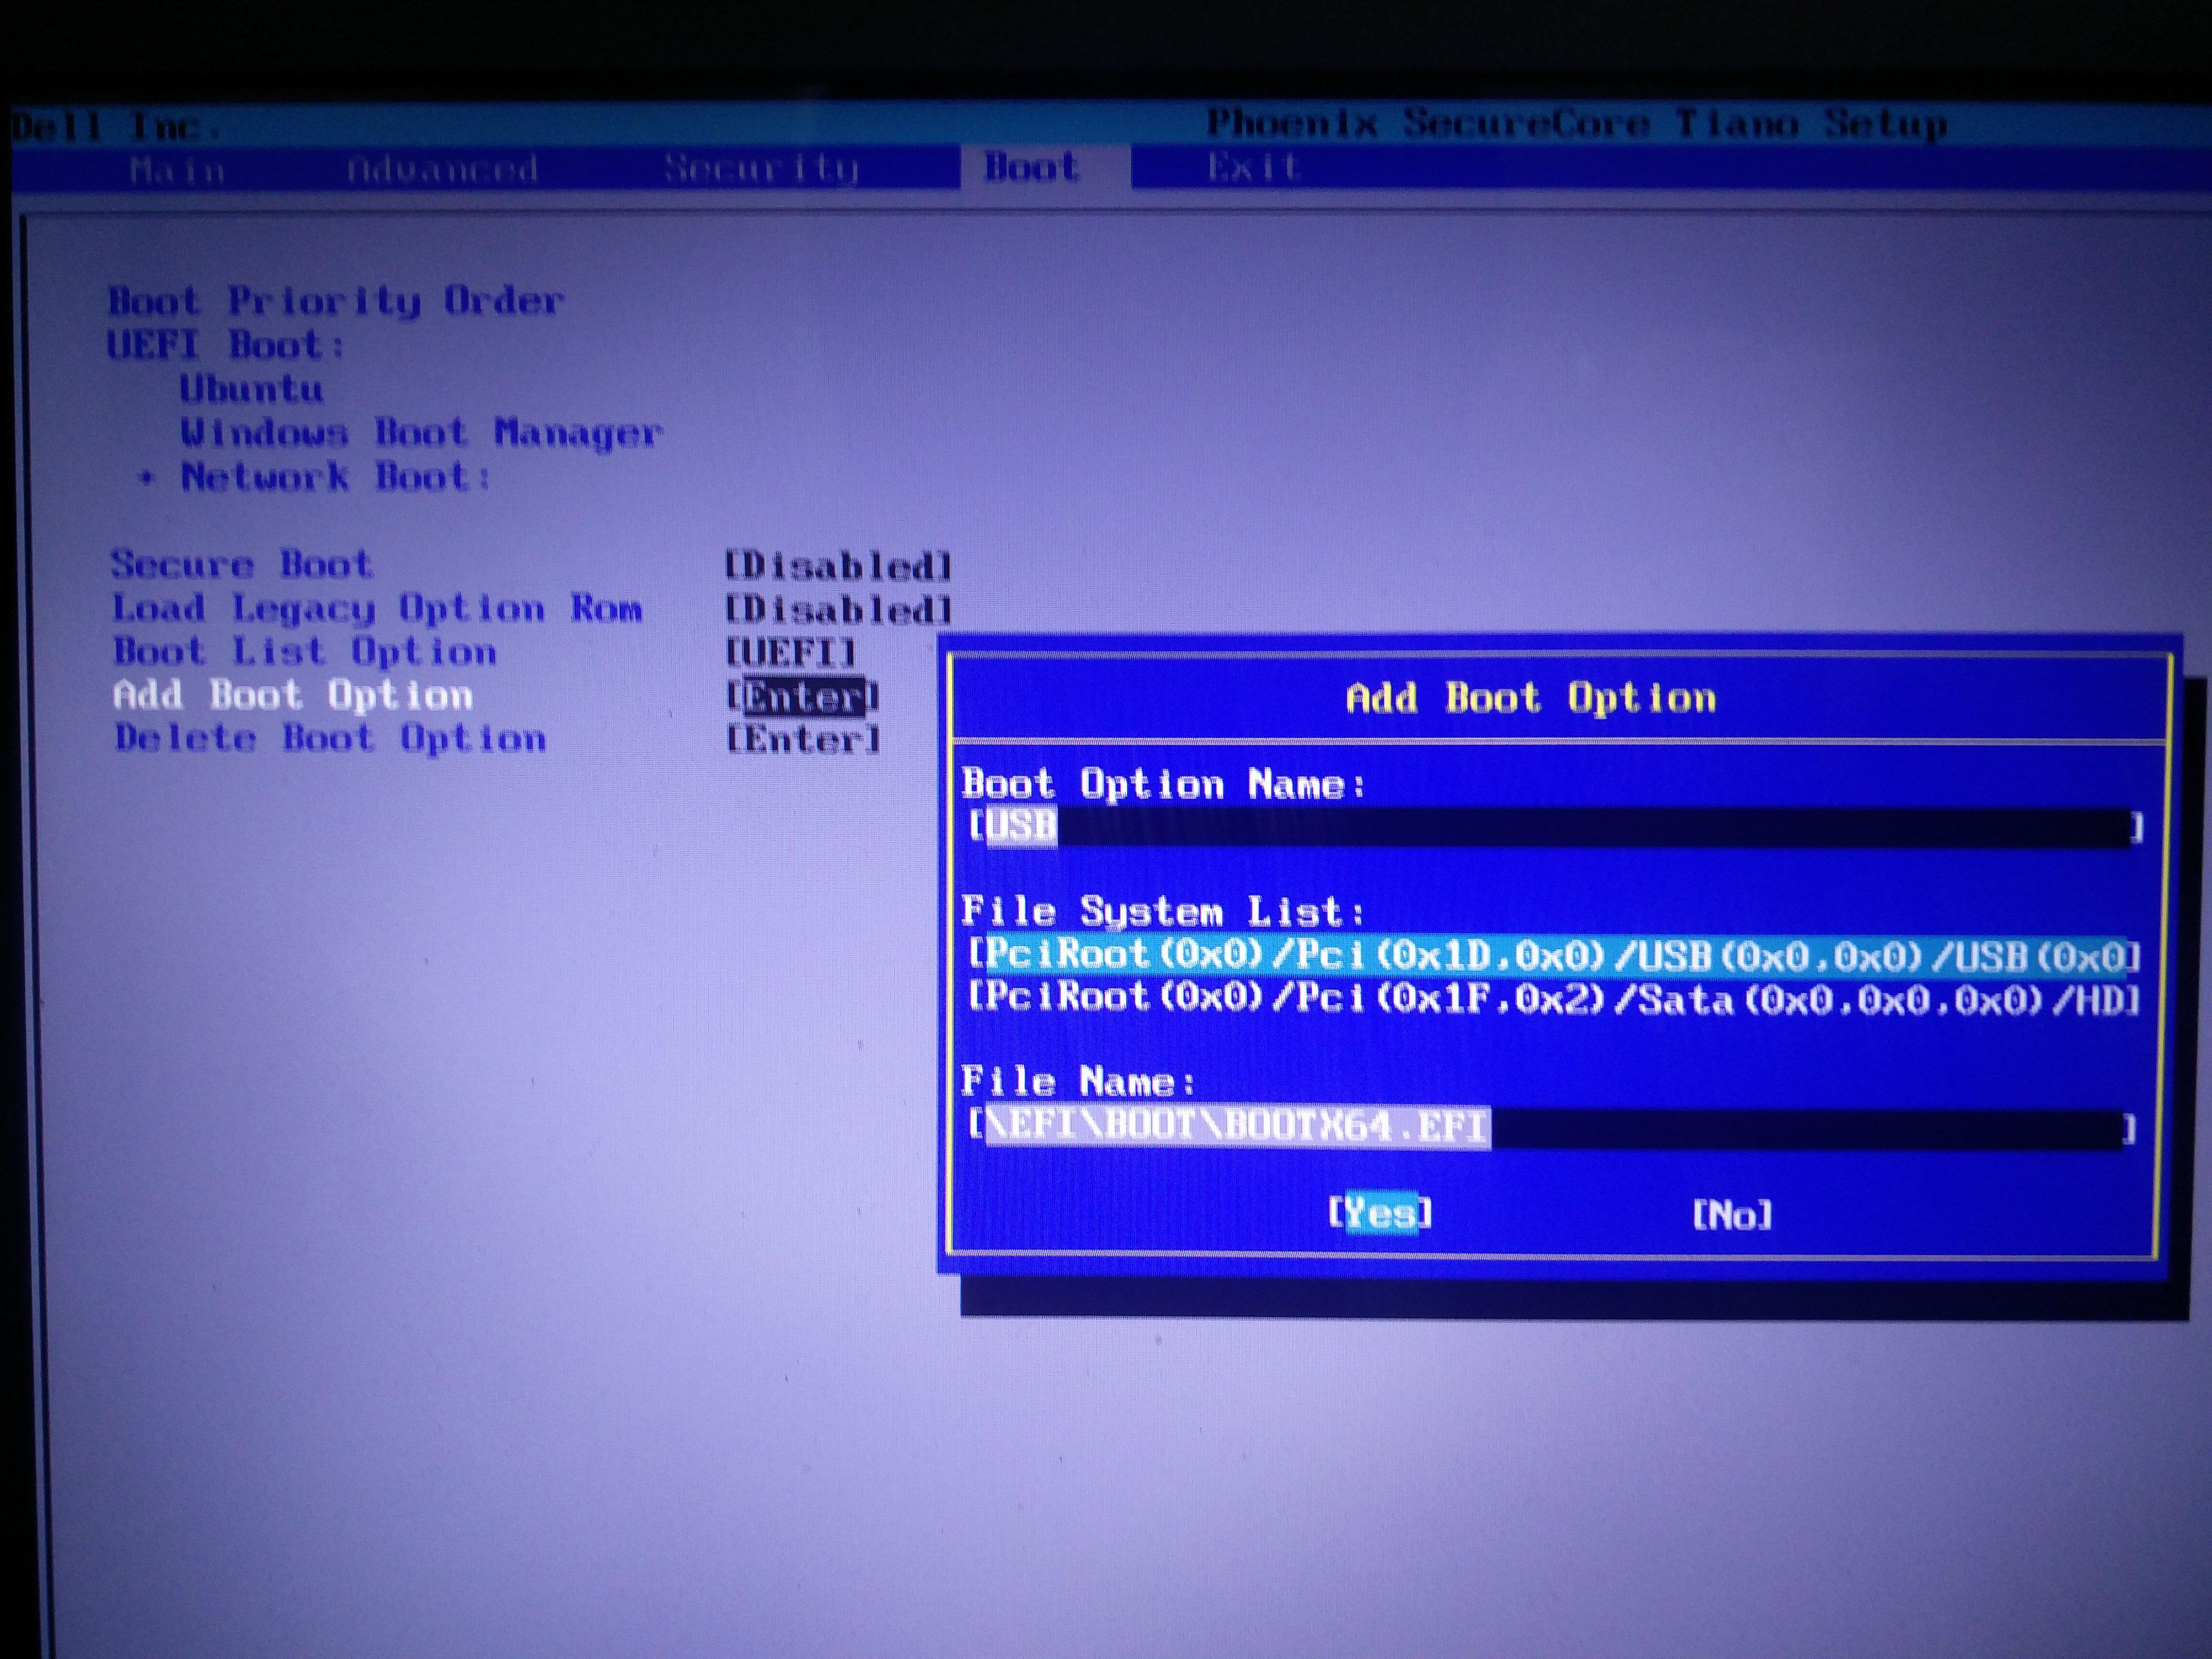
Note 1: UEFI path's slash is compatible with Microsoft path which uses \, Linux's / path is not supported.
Note 2: UEFI treats path case-insensitive
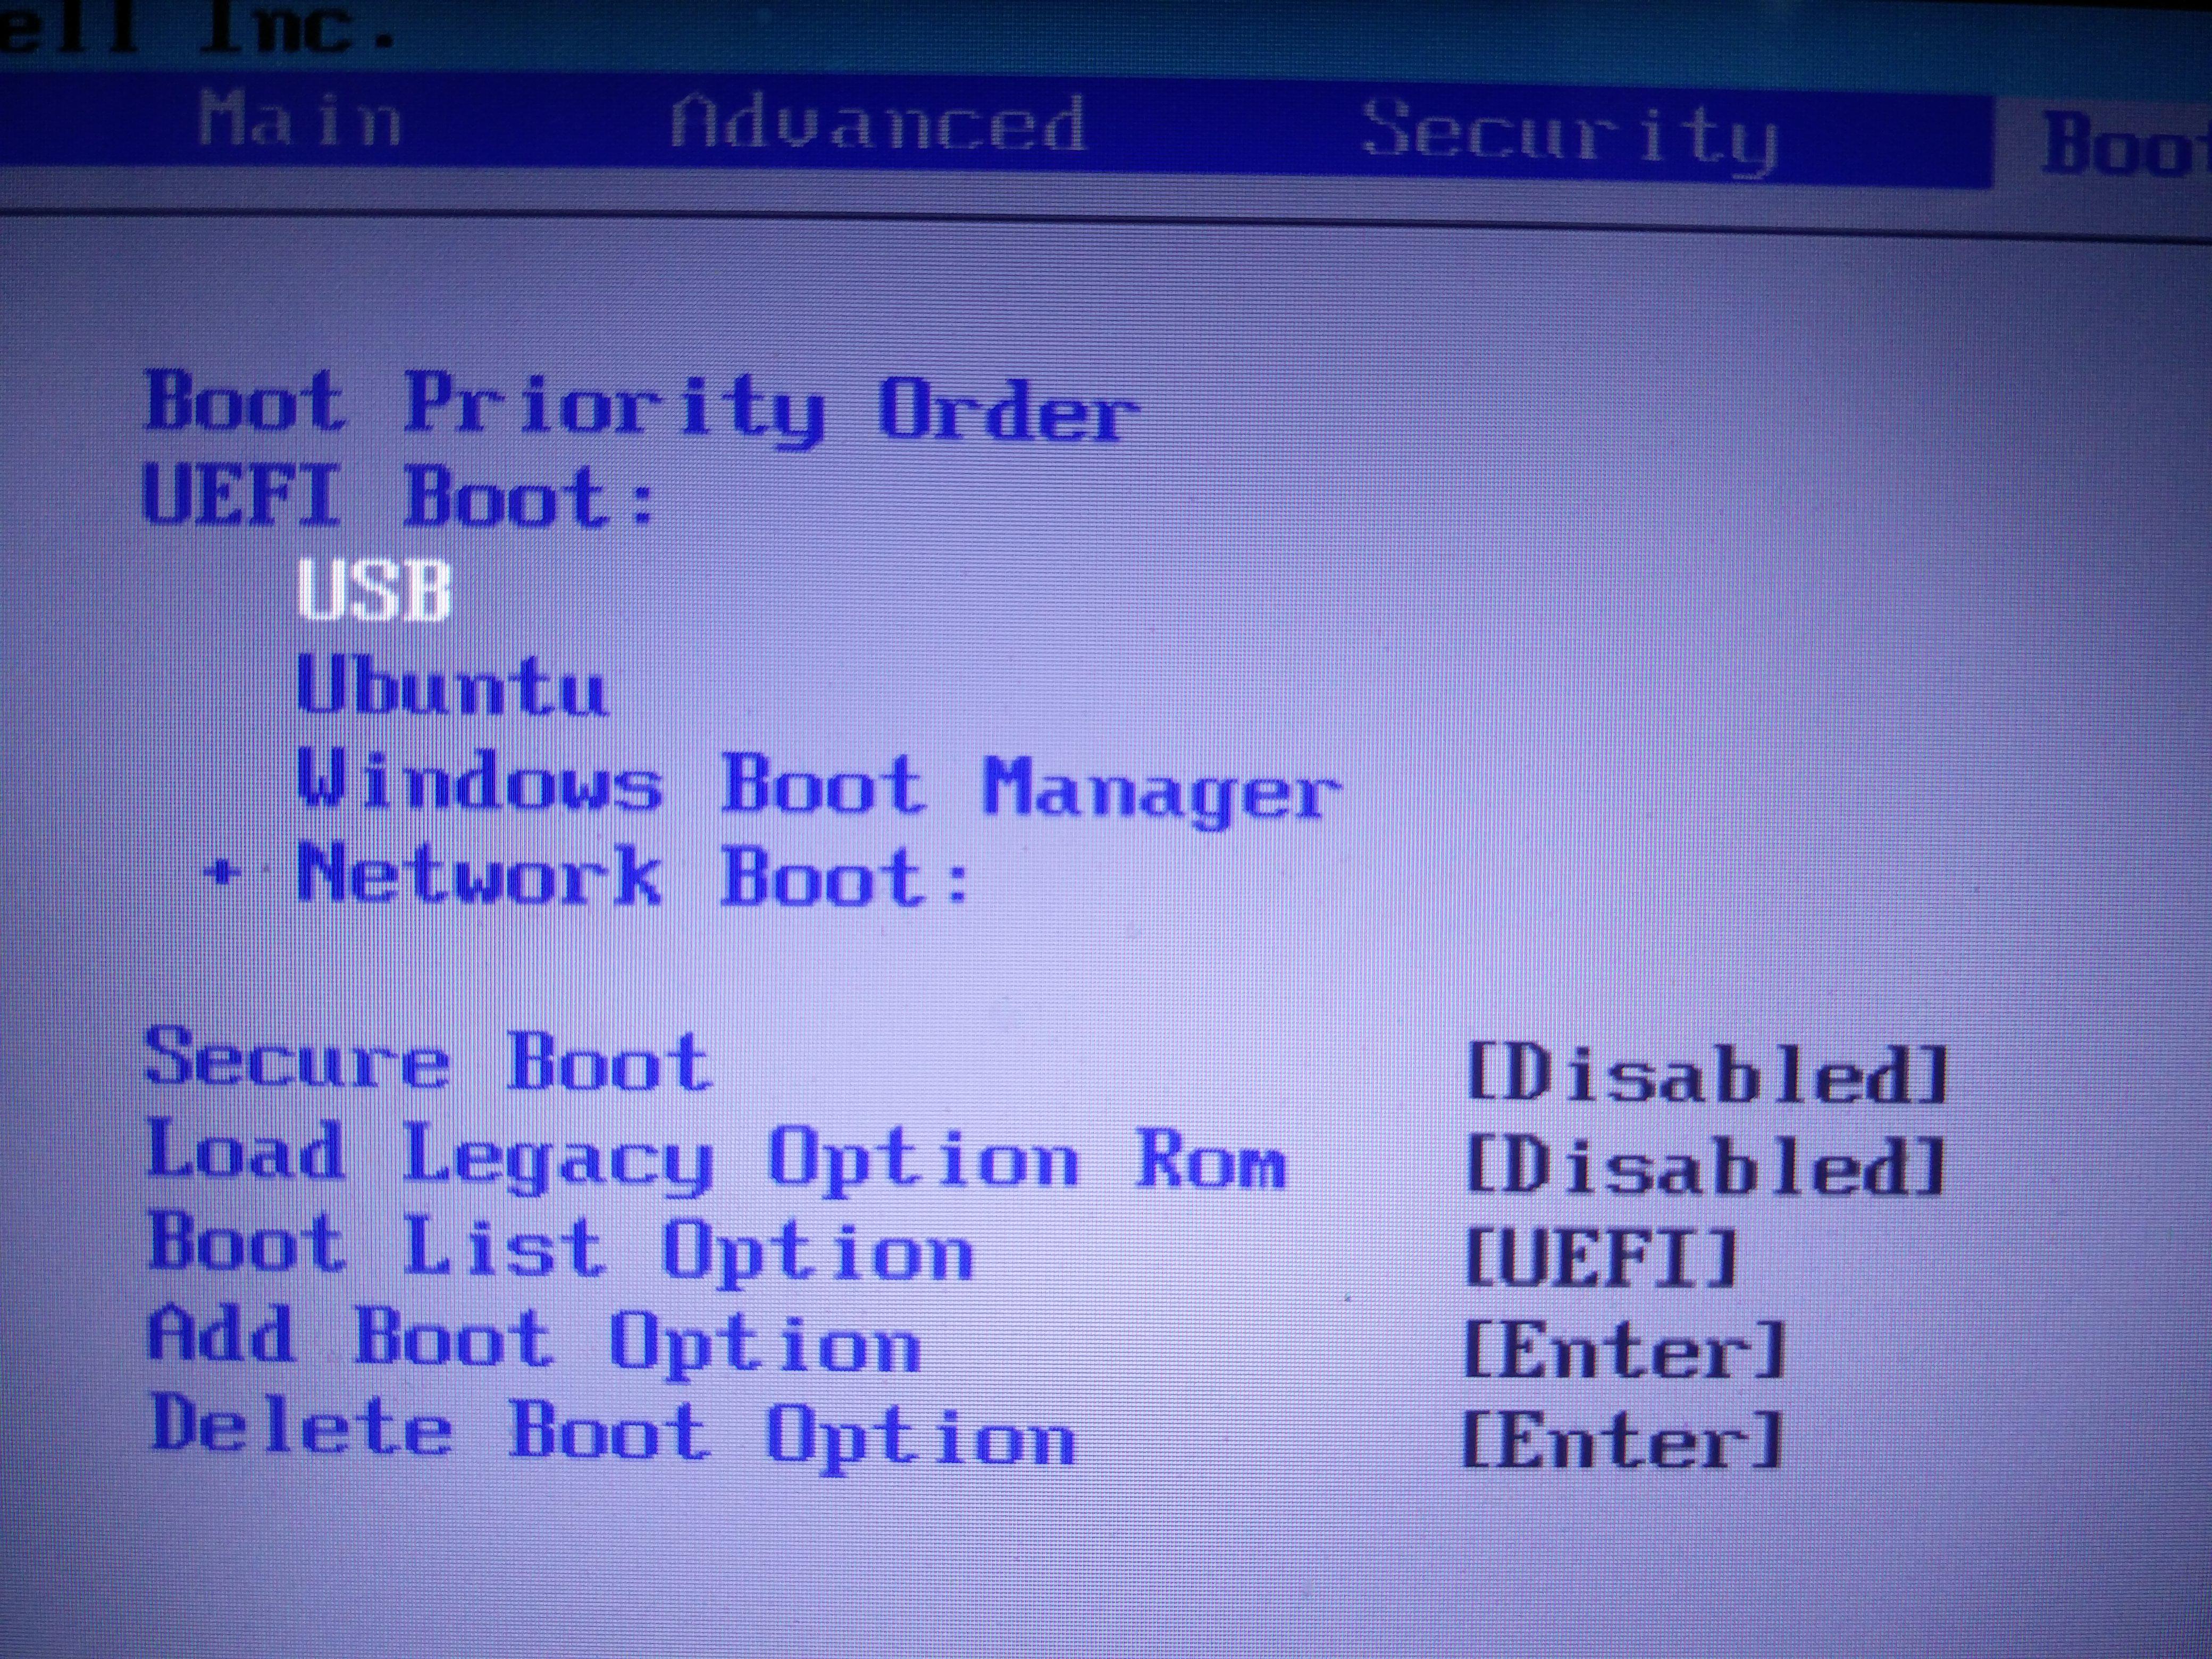
Afterwards, you should make USB boot option first.
Save and reboot.
Step 4: Boot from USB
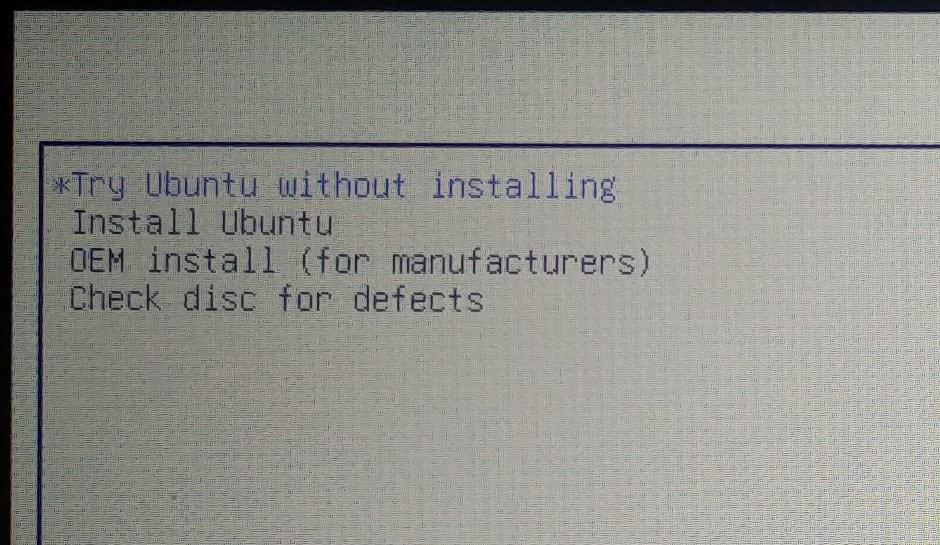
After reboot, you'll see the installation grub menu.
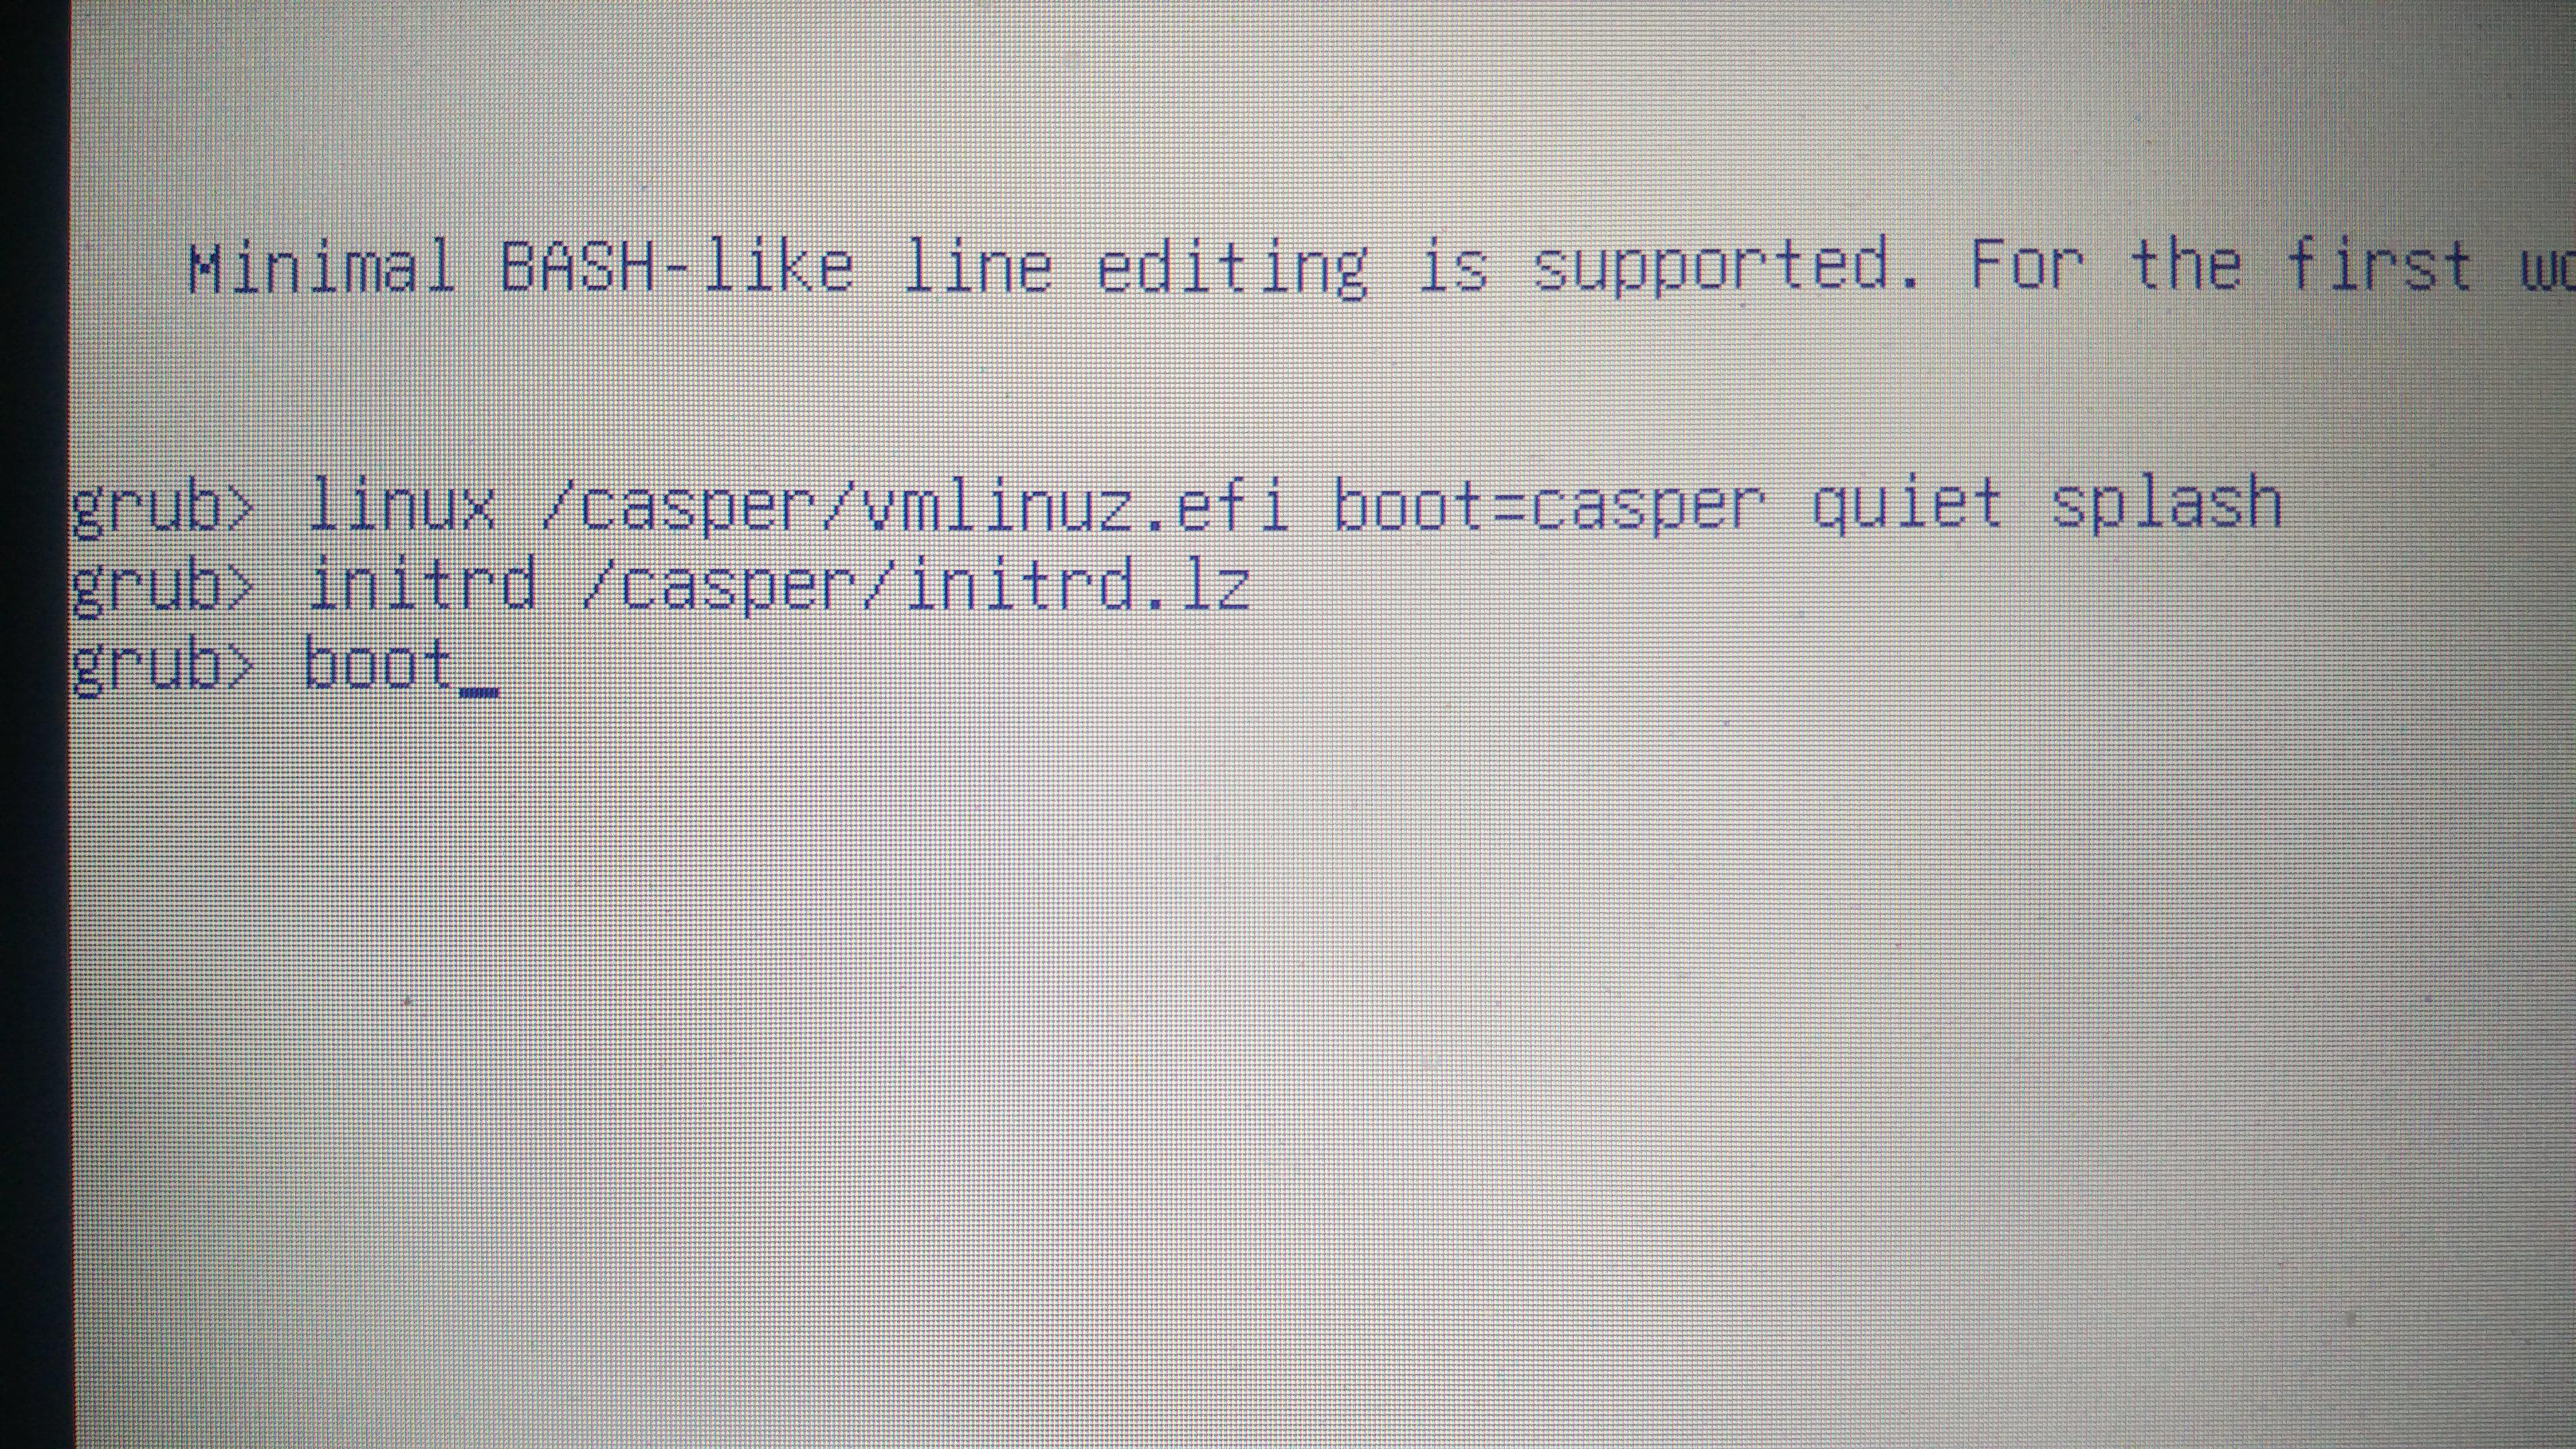
If there's something wrong here, and you got into the grub rescue terminal, like the following:

You'll need to boot from USB manually.
# Use `ls` to list bootable devices
grub> ls
(hd0) (hd0,msdos1) ...

# The `0` in `hd0` is the device id, and the `1` in `msdos1`
# is the partition id.
# If you're booting from USB, it is most likely to
# name the USB itself as hd0

# You need to set root to one partition before
# viewing any files
grub> set root=hd0,msdos1

# Then you can view its files.
# (Make sure you're booting from the correct partition)
grub> ls /
boot  [BOOT]  casper  dists  EFI  install  isolinux  md5sum.txt  pics  pool  preseed  README.diskdefines

# Afterwards, you can boot manually using the following commands
grub> linux /casper/vmlinuz.efi boot=casper quiet splash
grub> initrd /casper/initrd.lz
grub> boot
Step 5: Check boot mode
Before you install the distribution on your disk, you should check whether you're actually booting from UEFI mode.
To check whether you're booting in UEFI mode, use:
[ -d /sys/firmware/efi ] && echo "UEFI" || echo "Legacy"
Create a UEFI compatible USB (GPT Partition table)
Follow the Step 1 in the last section, but change one comand:
The mktable command:
>> sudo parted /dev/sdc mktable gpt
The good news is:
If you successfully boot from the USB, you're definitely in UEFI mode
But the bad news is that if you would like to make it bootable for other PCs, you need to
flash it back to msdos partition table.
If you're in grub-rescue, you'll see the partition differently:
grub> ls
(hd0) (hd0,gpt1) ...
Install Notes
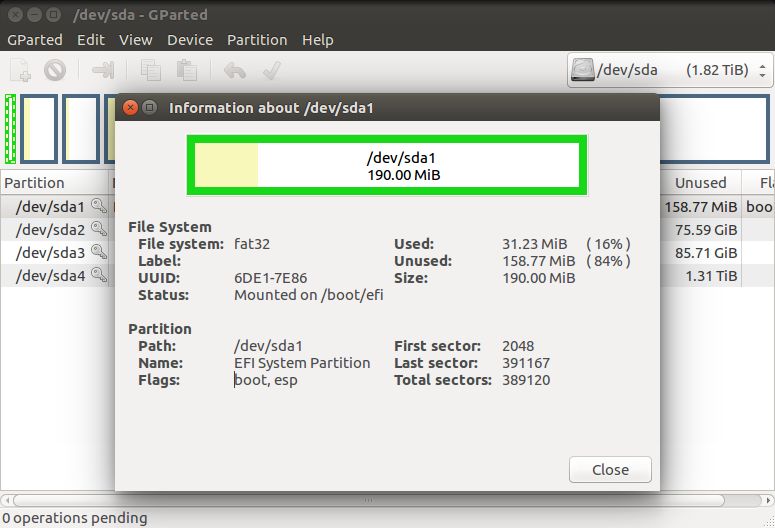
Install a UEFI compatible operating system requires that a ESP (EFI System Partition) is available on your hard drive.
You may use the advanced partition mode to configure your installation.
- Add a primary partition
- Select fs type as
ESP partition - Select mount point to
/boot/efi/ - Install boot to this partition
After installation completes, you should boot from hard drive and check the boot mode to ensure that you're booting in UEFI mode.
After install boot failure
If you boot failed after installation, you might need to manually Add boot option to your BIOS.
For instance, the default boot option for ubuntu is:
\EFI\UBUNTU\GRUBX64.EFI
For Fedora is:
\EFI\FEDORA\GRUBX64.EFI
How to boot from multiple different Linux distribution ISO images from a UEFI compatible USB device
Create a UEFI compatible USB device
Most steps are the same as above before the last extract ISO image content.
You have 2 choices here:
Easy Choice
-
Copy
EFIandbootdirectory from ISO into your USB diskNote: You can use
mountto mount the ISO to a directorysudo mount -o loop ~/Ubuntu-16.04-desktop-amd64.iso /mnt cp -r /mnt/EFI/ /mnt/boot/ <USB mount point>
- Copy the ISO file into
<USB mount point>/EFI/BOOT/ -
Edit the
grub.cfgat<USB mount point>/boot/grub/grub.cfgFor example, to boot Ubuntu 16.04 from ISO Image
- You should correctly setup isofile path
- Use
loopbackto create loopback device mapping to the content of the fs in ISO - Add
iso-scan/filename=$isofiletolinuxcommand parameters
menuentry "Boot Ubuntu 16.04 from ISO" { set isofile="/efi/boot/ubuntu-16.04-desktop-amd64.iso" loopback loop $isofile linux (loop)/casper/vmlinuz.efi boot=casper iso-scan/filename=$isofile noprompt noeject quiet splash initrd (loop)/casper/initrd.lz } - Copy Other ISOs into
<USB mount point>/EFI/BOOT/ -
Edit the
grub.cfgagain to add other menusTake Fedora 25 as an example:
You should always reference to the original
grub.cfgin the ISO to get a brief example of how it should be booted.menuentry "Boot Fedora 25 from ISO" { set isofile="/efi/boot/Fedora-Workstation-Live-x86_64-25-1.3.iso" loopback loop $isofile linuxefi (loop)/images/pxeboot/vmlinuz iso-scan/filename=$isofile root=live:CDLABEL=Fedora-WS-Live-25-1-3 rd.live.image quiet initrdefi (loop)/images/pxeboot/initrd.img } -
The final directory structure should look like:
>> tree <USB mount point> . ├── boot │ └── grub │ ├── efi.img │ ├── font.pf2 │ ├── grub.cfg │ ├── loopback.cfg │ └── x86_64-efi │ └── ... └── EFI └── BOOT ├── BOOTx64.EFI ├── Fedora-Workstation-Live-x86_64-25-1.3.iso ├── grubx64.efi └── ubuntu-16.04-desktop-amd64.iso - Reboot and choose whatever you want
Harder Choice
It only differs in first step from the easy choice. In easy choice, we're using the ubuntu's default grub image.
Here we can make a customized one.
-
Install the grub's EFI version
sudo apt install grub-efi-amd64-bin
-
Use
grub-mkimageto create a boot image (man grub-mkimagefor help)You may choose what mod to pack. For example:
  grub-mkimage -o bootx64.efi -p /efi/boot -O x86_64-efi \
    all_video boot btrfs cat chain \
    configfile echo efi_gop efi_uga \
    efifwsetup exfat ext2 fat \
    gfxterm gfxterm_background gfxterm_menu \
    hfsplus iso9660 linux loadenv \
    loopback ls lsefi normal ntfs \
    part_gpt part_msdos search search_fs_file \
    search_fs_uuid search_label test udf usb
Put it to
<USB mount point>/EFI/BOOT/ - The
grub.cfgin following steps should be put<USB mount point>/EFI/BOOT/directory -
The final directory structure would be:
  >> tree <USB mount point>
  .
  └── EFI
      └── BOOT
	  ├── Fedora-Workstation-Live-x86_64-25-1.3.iso
	  ├── bootx64.efi
	  ├── grub.cfg
	  └── ubuntu-16.04-desktop-amd64.iso
How to boot Windows 10 USB in grub
Grub does not officially support bootint Windows in place, and therefore
chainloader should be used to load the windows bootloader to load windows.
Normally, when correctly flashed a bootable Windows USB, the firmware should be able to load you into Windows.
However, if it fails to do so, and you have another bootable USB with grub, you may try the following steps to boot Windows manually.
grub> set root=hd0,msdos1 # The Windows USB Stick
grub> chainloader /efi/boot/bootx64.efi
grub> boot
It should correctly arouse Windows now.
Comments
Comments powered by Disqus